


Dr Bill’s Method of Ear Posting
Items Required
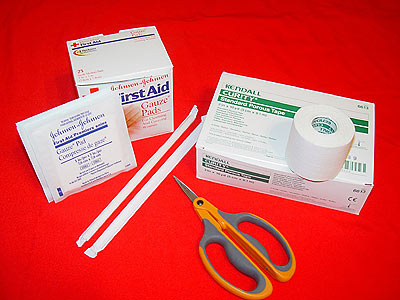
Sterile Gauze Pads (Standard 3x3) approximately 2 needed per ear, Good Quality 2 inch Adhesive Tape, CURITY Standard Porous Tape is the BEST!; McDonald’s Large Drink Straw, Scissors
ABOUT AUTHOR: Dr. William V. Martin DVM introduced this method of Ear Posting to me. Dr. Bill (as he is commonly called) resides in Hendersonville, North Carolina, and though retired, still retains a practice for Ear Cropping and Corrective Ear Surgery primarily for Dobermans, Great Danes, and Pit Bull Terriers. He has clients come to him from all over the United States, and is considered by many to be the definitive “expert” in Corrective Ear Surgery. Although he uses a “Styrofoam cup” immediately after cropping young puppies, this method is used after the cups are removed and on any dog older than a young puppy until the Ears are standing.
*** Note: Altobello puppies have for a long period of time now used Styrofoam cup after surgery, instead of the old method with the wire frame, and new page with this is in preparation; but usually when you get your puppy it is already over the "Styrofoam cup" phase - all stitches are healed and you need to start taping/posting ears.***
ABOUT METHOD: I have tried almost every method available on the Internet, tampons, sticks, and Quick Brace to list a few, but Dr. Bill’s Method is by far, the easiest, most economical, most effective and better for your dogs general health, than any of those I have tried. Simple to construct, from easily found materials, Dr. Bill’s posts are the lightest, most non-invasive form of Ear Posting, which both you and your puppy will soon come to appreciate. The general idea behind the Method is “simplicity and effectiveness” and the elements which make it successful are: STRENGTH: provided by the plastic straw; PROTECTION: provided by the Adhesive Tape; DOG FRIENDLY: by being very lightweight, the puppy does not have some bulky apparatus to lug around, the straw provides an airway to the Ear Canal, and the pup’s hearing is not impaired. There are some important things to remember, and I cannot emphasize these enough. First and foremost, you use a high quality Adhesive Tape. Believe me when I say, I have searched the planet for the “right” tape, and by using the correct tape you will find that the Posts stick better, and stay on much longer. Dr. Bill recommends KENDALL CURITY STANDARD POROUS TAPE. It can be found on the Internet at several Professional Medical Supply websites, or your own Vet may be a resource. This tape is very porous, which allows the ear to “breathe”, while supplying the “best” adhesion. Trust me, don’t scrimp in this department, the tape is probably the single important piece of the puzzle. The MCDONALD’S Large Drink Straw provides a lot of strength and support, while being lightweight, flexible, and allowing an “airway” to the bottom of the Ear Canal. I asked a Manager at McDonald’s for a few, and she gave me a thousand of them. Hope I never need that many! Gauze pads are easily found at every drugstore, and I suggest you get the generic “store” brand, as they are less expensive, and will be covered with tape anyway. All you need now is a good pair of scissors, and an assistant to help you hold your subject. Study the pictures carefully, as I have illustrated in detail, so you get both the materials and the concept correct.
PREPARING THE POSTS
On a clean surface, fold out the 3x3 Gauze Pads in half, depending on the size of your puppy, you may need as many as three pads to achieve the correct size of the post. It should be big enough around to fit inside the ear.
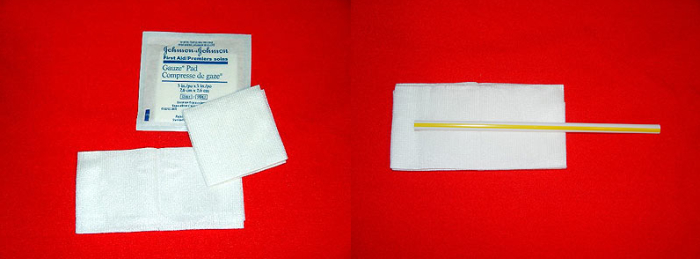
Lay out the straw in the center of the gauze pads, leaving about three quarters of one inch of gauze on one end. This is the part that will sit in the cradle of the ear, so it is important that the gauze extends the straw. Now put a piece of tape, about five inches long directly over the straw, this holds the straw in place as you prepare the post.
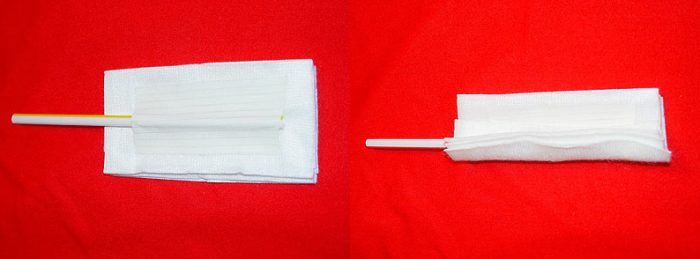
Now roll the gauze and the straw into a tube. Starting at the bottom of the tube, begin wrapping the tape around the gauze making sure that you leave three quarters of a inch of exposed gauze on the end. This will be the “cushion” which sits in the bottom of the ear canal. As you reach the top of the gauze, twist the tape, so you can now "Back-Tape" the tube from top to bottom.

“Back-Taping” is simply reversing the tape so that the “sticky” side is now out. When you reach the bottom of the tape on the tube, cut off the tape and secure the end to the post.

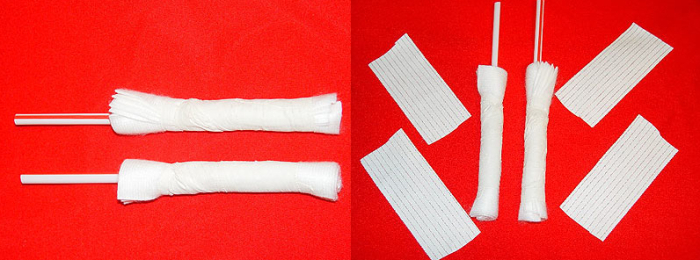
For right now you should have a post that is very sticky and looks something like this, don't worry about the length of the straw; you will cut it to fit, later in the process. Obviously, you will have to repeat this step so that you will have a post for each ear, and then you will be ready to apply the post to your pup's ears.
APPLYING THE POSTS
Having your assistant hold the puppy's head, take one of the posts and insert it down into the pup's ear. As always be very careful, but be sure to get the post all the way down into the ear. The soft gauze tip will sit in the bottom of the ear and protect it. Once the post is in place, gently wrap the ear around the post and begin taping as close to the base of the ear as you can get. Wrap the first piece, usually about five inches long, by first adhering it to the sticky part of the post, then wrapping in a clockwise manner around the bottom of the ear. This part requires a little bit of practice. It's important to have the tape tight enough to secure the ear, but not too tight to hinder circulation. The tape DOES NOT have to be tight, just stuck to the ear.

Now wrap another five-inch piece of tape, in the same manner, around the top of the ear. Same rules apply in terms of tightness. Now simply repeat the process for the remaining ear.
COMPLETING THE POST
Now the “figure-eight” which holds the two ears together, and provides the stability for the Post. Take your tape and ”rip” a piece about one quarter inch wide, and about two feet long. I find that it is best to reserve a roll of tape specifically for this, as you can continue to “rip” strips from it.

Starting at the bottom of either ear, stick one end of the strip to the tape on the pup's ear, and begin wrapping around both ears in a “figure-eight” motion. Have your assistant hold both ears up, and then “relax” them slightly, as this is the position that you want the ears to remain at after the post is applied. You will continue taping around both ears with the strip until you have reached the end.

Now take a piece of tape, about two inches long, and wrap it around the “figure-eight” between the ears.
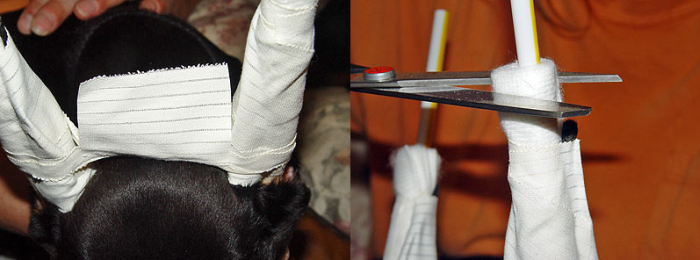
This will prevent the tape from sticking to the puppy's head. Final step, cut the top of the straw, just above the top of the ear. This method provides a lightweight yet sturdy post for the Cropped Ears.

When you notice the post is loosening or becomes wet, you can replace it easily. I have experienced great success with this method, and without messy liquid adhesives, bulky, protruding apparatus, and as little disruption to the puppy's normal activities. I have asked for and received Dr. Bill's permission to print these instructions, and make them available on the Internet to anyone that is interested. Many thanks to him and his staff for showing me a “better” way to post ears for my dogs. Questions and comments are always welcome.
Author: Jon Martin - This email address is being protected from spambots. You need JavaScript enabled to view it.